As a passionate photographer, I started my journey years ago by transforming my bedroom into a DIY studio. With nothing but a bucket of paint and a wall, I created a simple yet effective backdrop for my shoots. Due to financial constraints, I began with speedlights, but as I grew in skill and experience, I added 3 studio 100w heads to my arsenal. While I was always fascinated by complex lighting setups, for some inexplicable reason, I never found studio heads to be my favorite. Nevertheless, since they added up as more lights I kept using them. As time went on, I became more interested in the cinematic aspect of photography and began experimenting with various light fixtures to use as practicals in my shots. It was during this period that I discovered LED lights, and my interest in them was sparked.
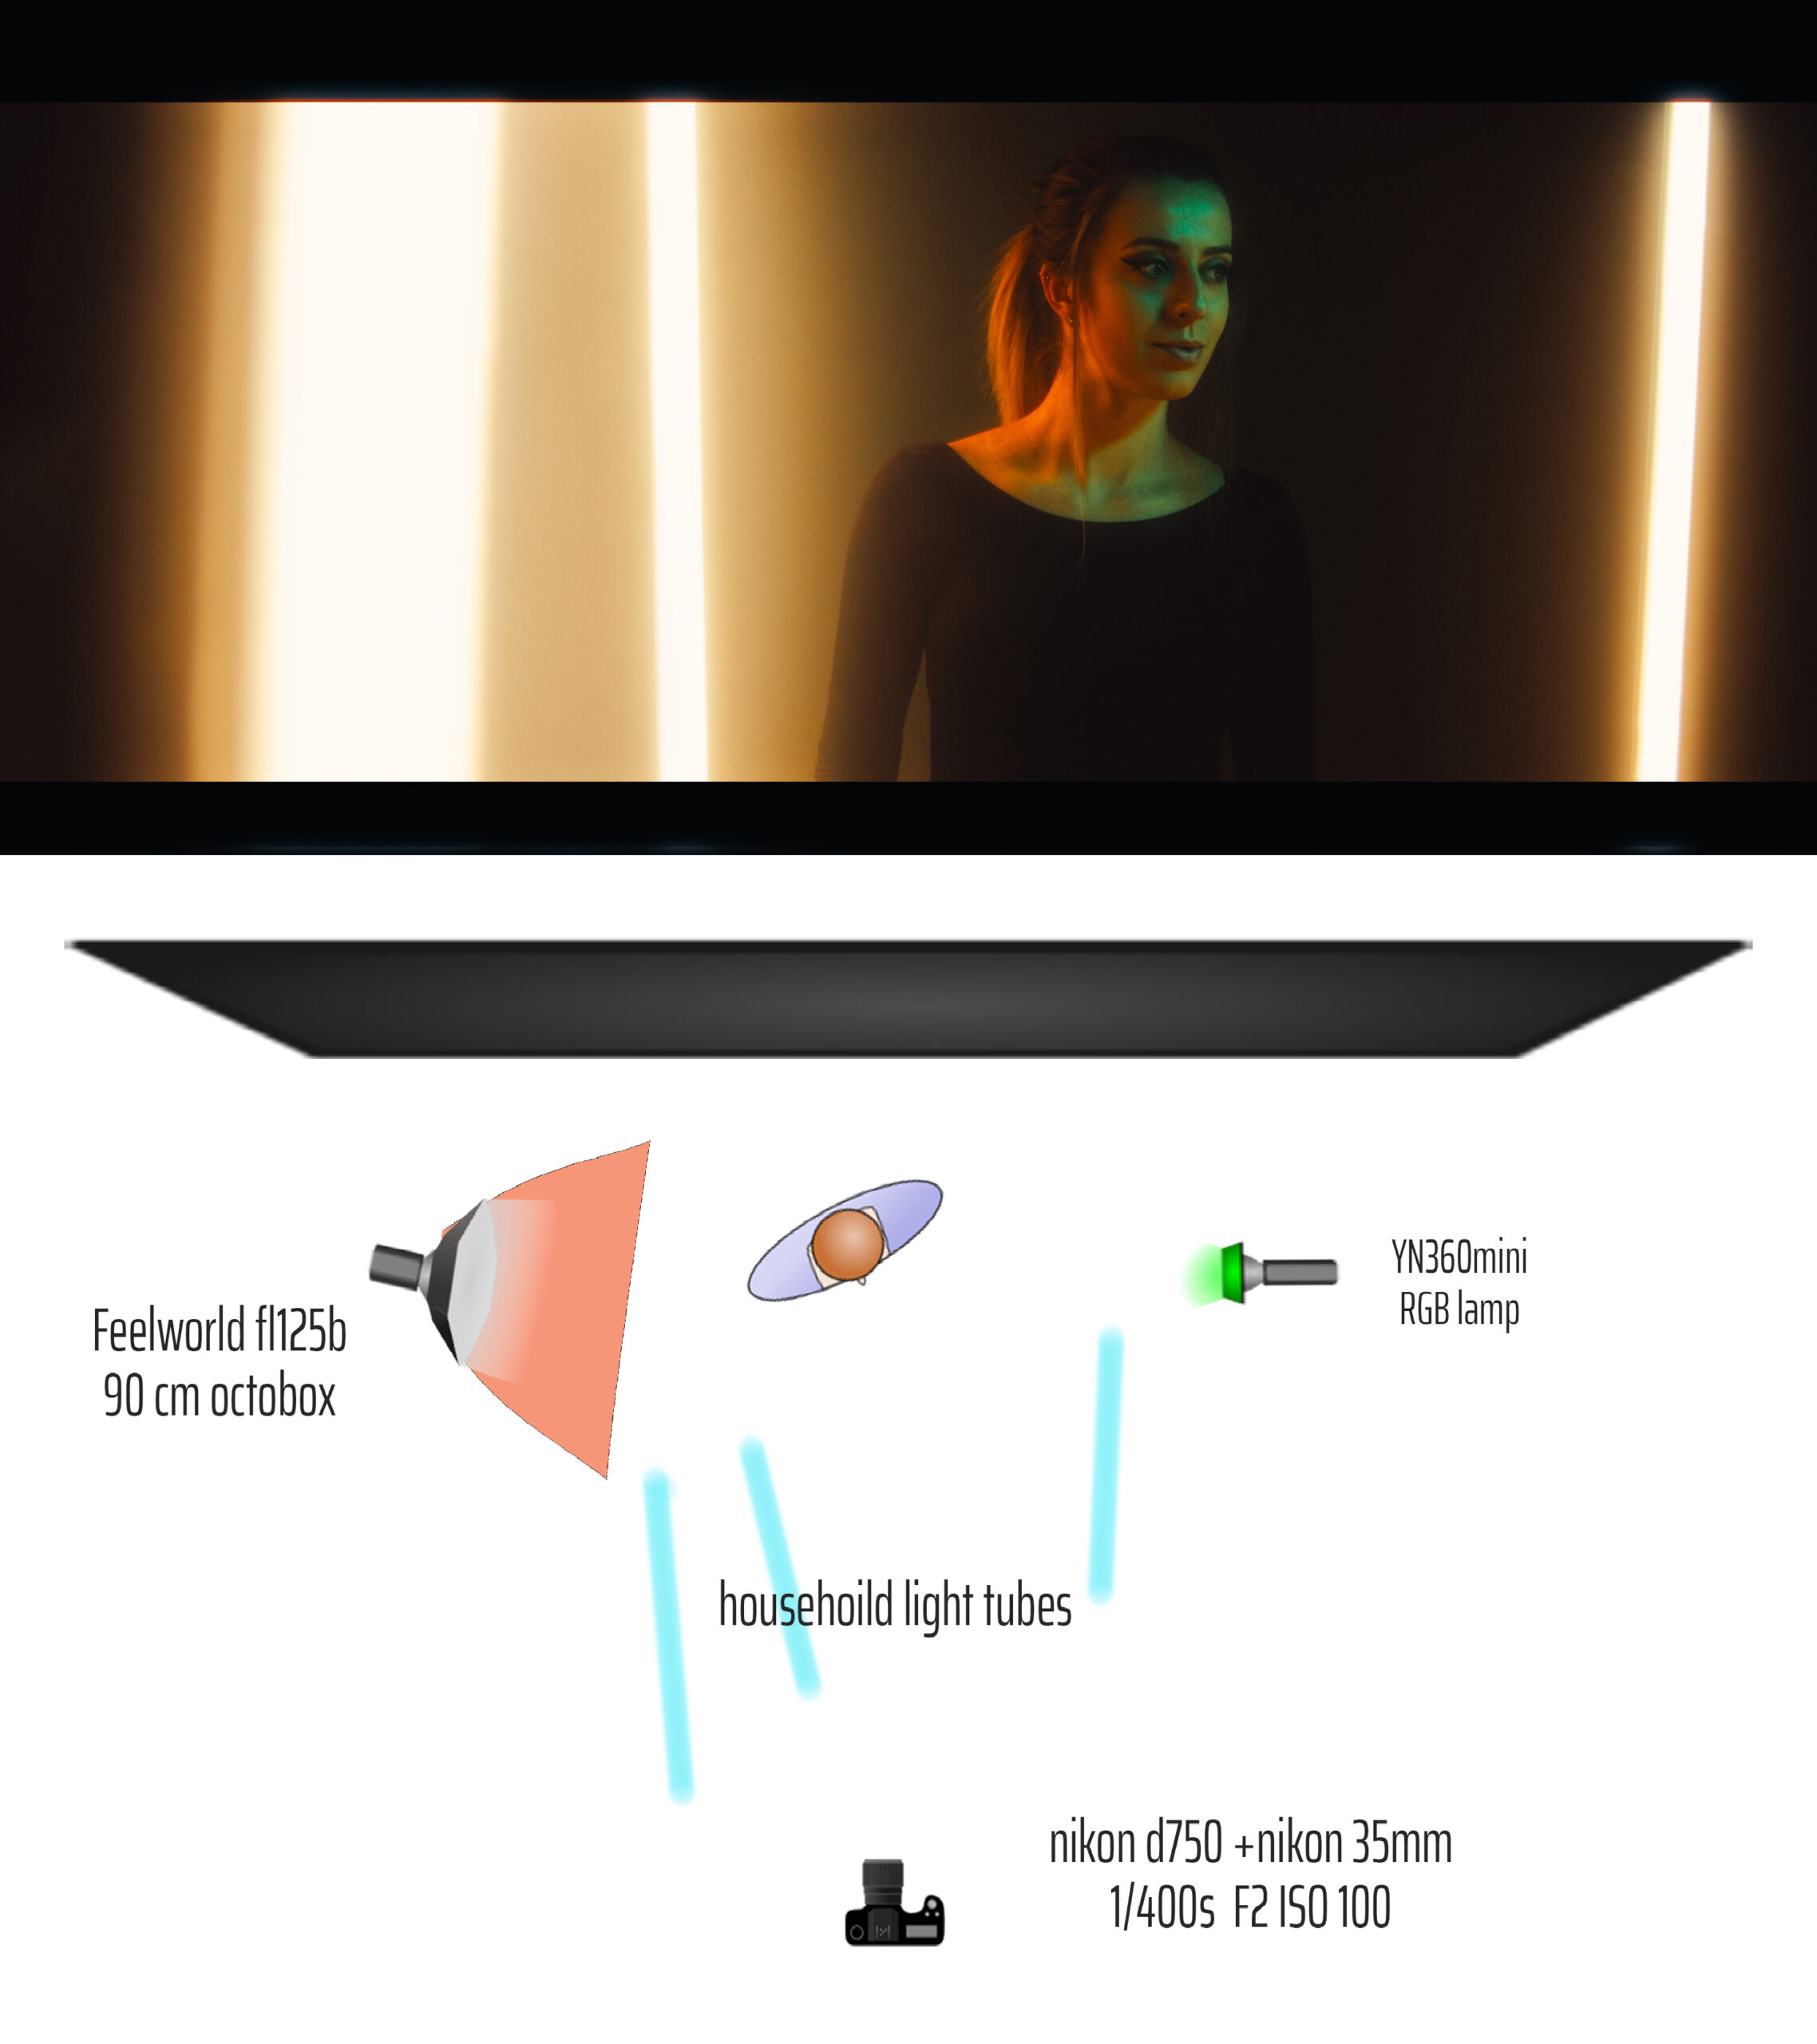
At first, I bought 5 tubes that were meant to replace neon tubes and started playing around with them. They cost around 10$ when factoring in the wiring and the picture they need to be mounted to so it’s a good solution to start with if you need lots of lights. But their output power and color temperature are fixed and the CRI rating is usually around 80 so not ideal as more than practical lights or learning tools. Over time I also got an RGB panel and a cube light, obviously not powerful enough for key lights but generally nice to have on, especially on outdoor shoots
Thanks to Feelworld who kindly sent over one of the Feelworld FL125B video lights I started to understand why for my style of photography LED lights make way more sense than flashes and now I want more of them. This light was my very first studio LED light and it changed my perception of flash photography. I received the package on a sunny day and to my surprise, it was powerful enough to balance the light coming through the window. I was not able to overpower it but keep in mind this is just a 125w head. I don’t think overall LEDs are at the moment as bright as flash but for cinematic-style photography where I never aim for crazy short shutter speeds and freezing all the motion in my shots.
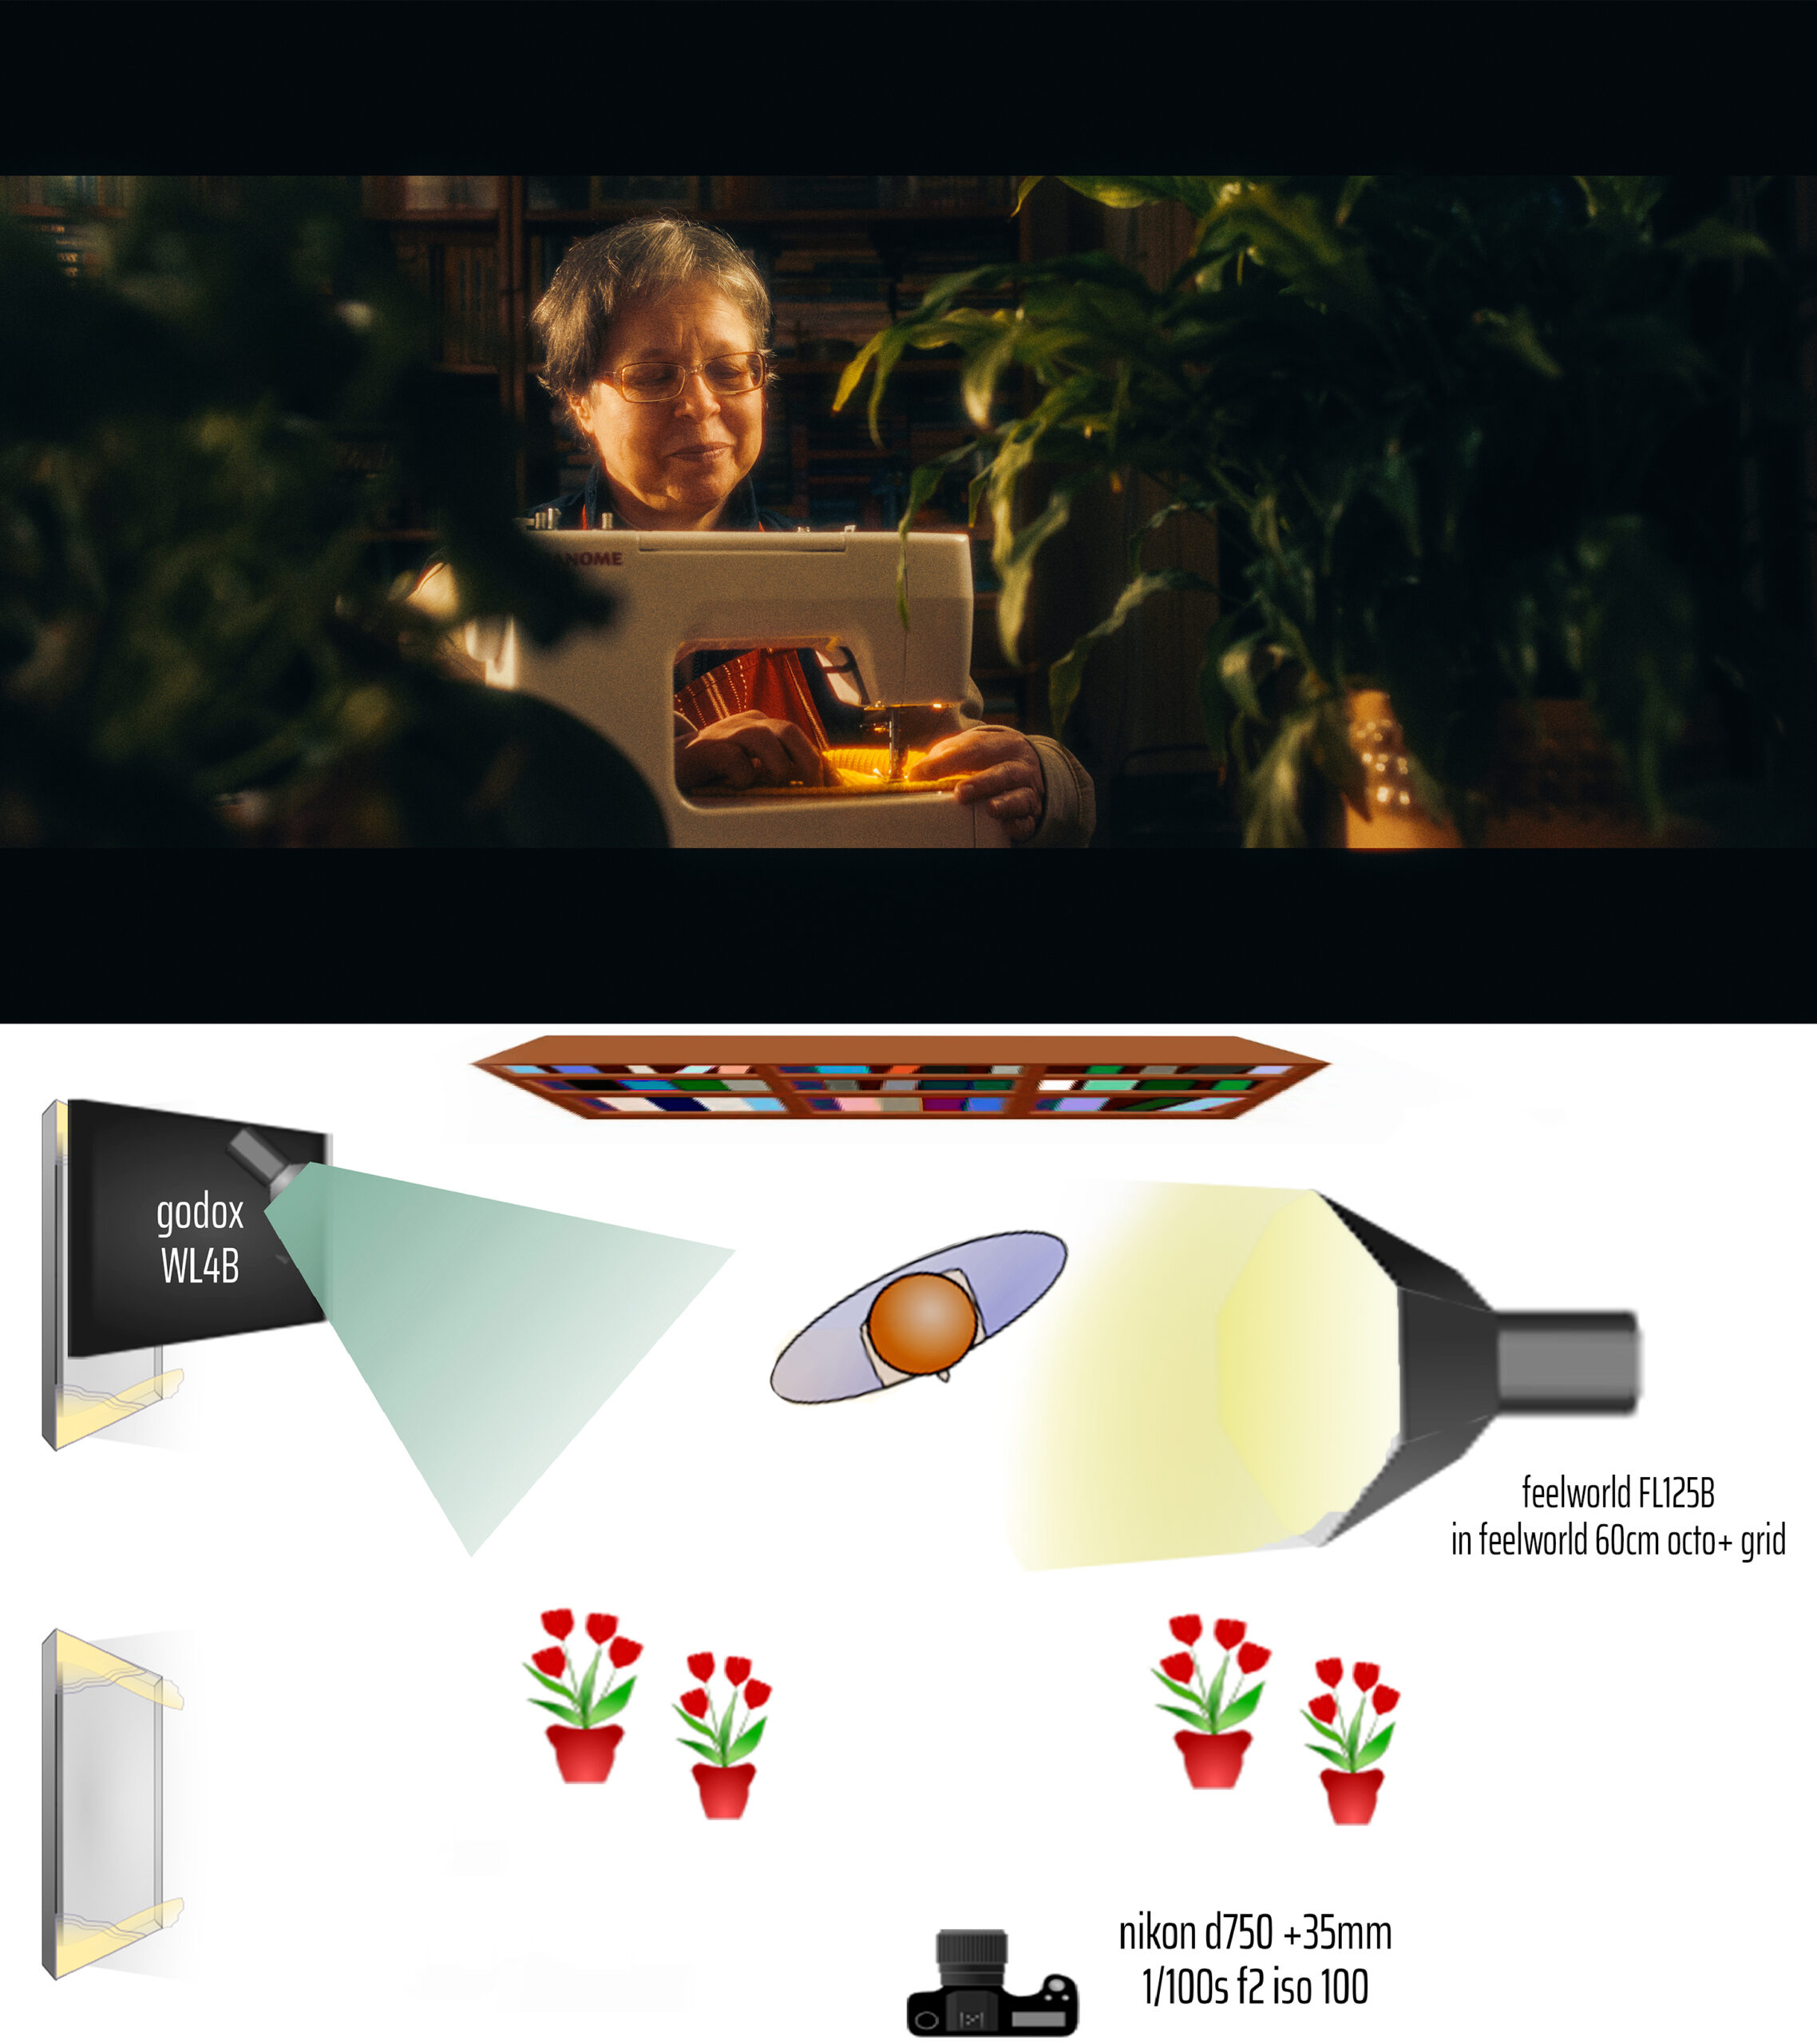

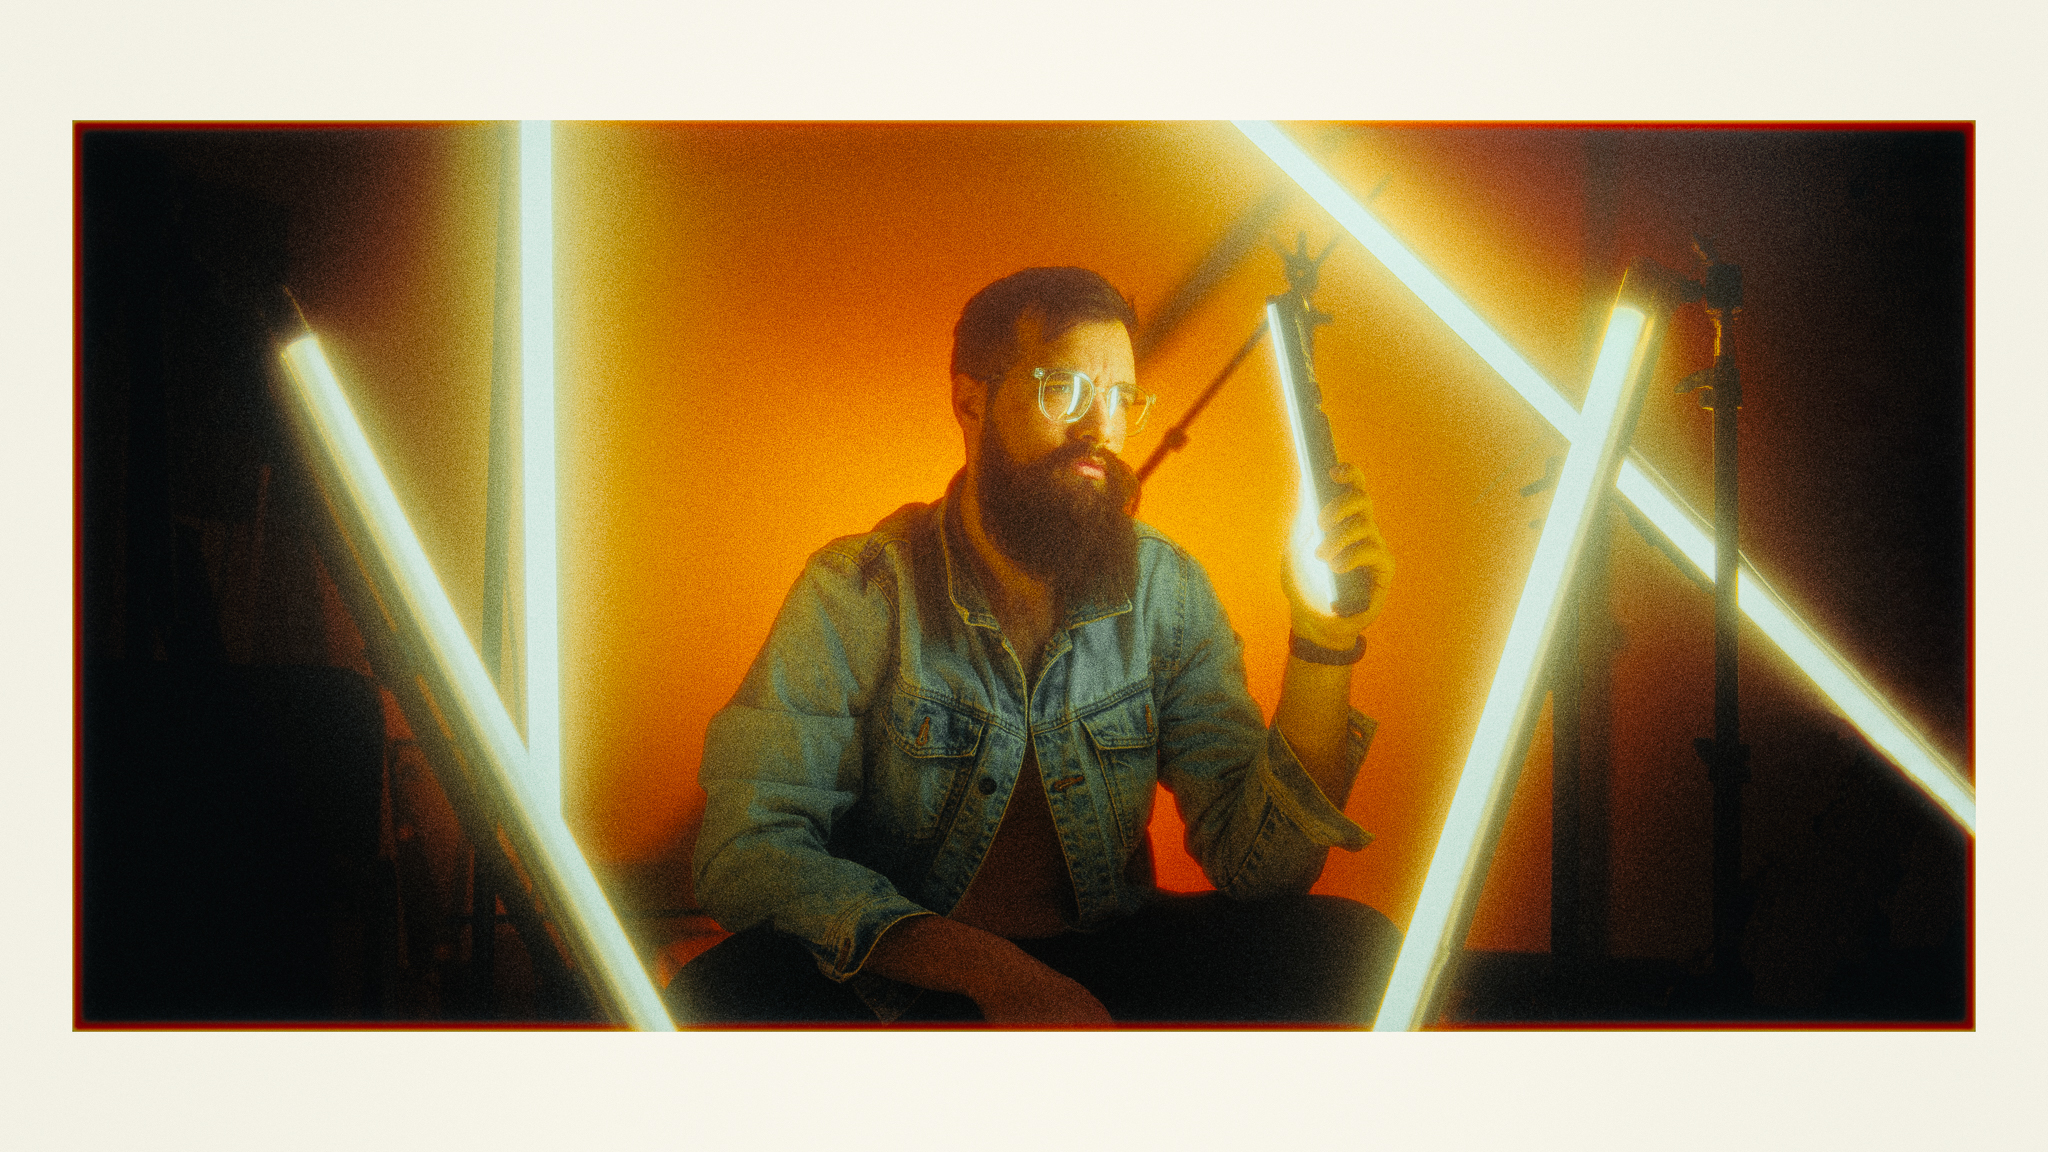
One other thing that this light does is enable me to simulate sunlight inside. Especially paired with a fresnel modifier or a snoot and some smoke you can easily create a sunset atmosphere inside a room or just add some accent highlights with a beautiful warm glow on an overcast day.
The most obvious benefit of switching from flash to continuous light, for me, was that I was able to see what I’m doing in real-time and better understand how the light modifiers are shaping the light. My style is on the darker side with strong shadows to add mystery so for me, blasting the entire scene with lots of light is not desirable and I love to be able to know where exactly the light is falling. I am frequently using a smoke machine, mist filters, and even foreground elements in front of the lens to add texture, and being able to see the effect they have on the final shot in real time helped tremendously helpful. Continuous lights took all the guessing game out of my photoshoots.

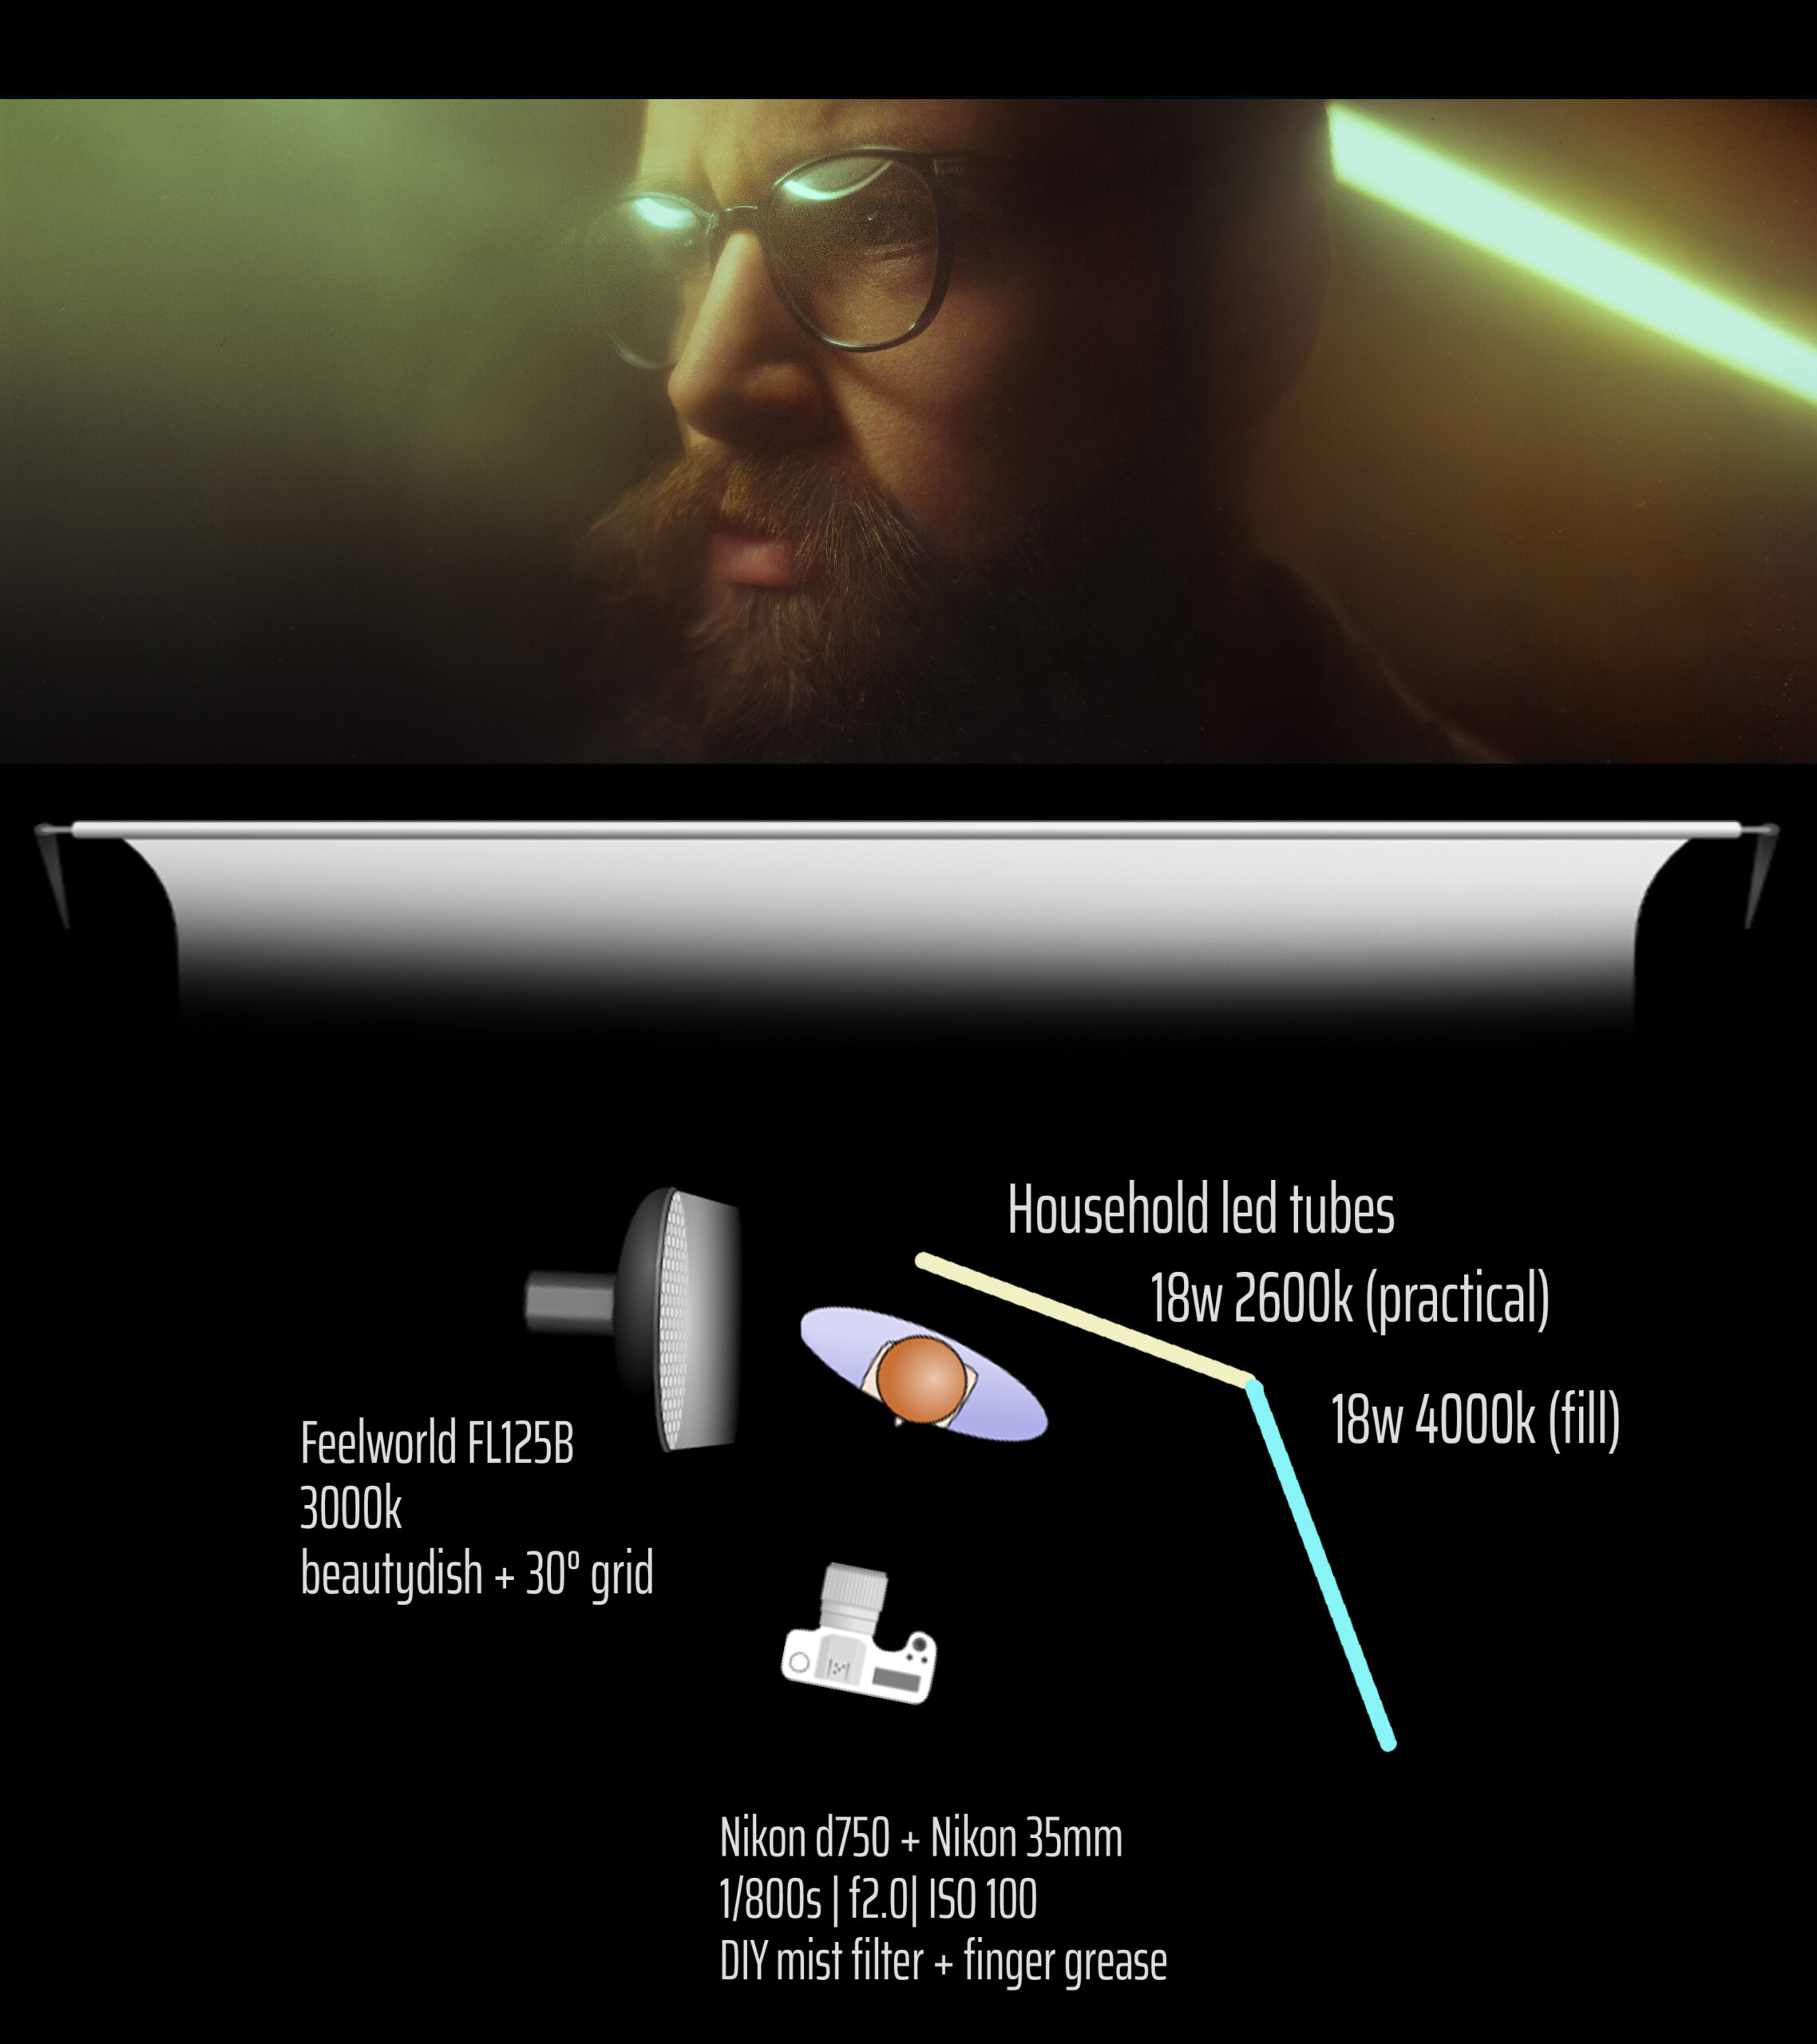
What’s even more impressive is that the light is bi-color, which means you can adjust the color temperature from 2600k to 5700k without needing gels. This feature allows me to create color contrast between different light sources and add visual interest to images fast. For instance, in one of my recent shoots, I set the FL125B to a colder tone than the practical so I could get a warm glow from the tube. The result was stunning, and achieving something like this with a flash would have meant fiddling around with CTO gels until I found the right amount to bring the key light just slightly above the tube warmth. But one thing to keep in mind when mixing and matching photography lights with household items is that most LED appliances have a rather low CRI rating and its better to use them as practicals or hair lights as they won’t be able to render colors well and especially skin toes will have to suffer.

Most led lights nowadays, also have wifi control enabled and on one hand, this can come in handy when your lights are physically out of reach, but for the most time, I would prefer not to take my phone out during a shoot as it can easily distracting both for me and my models. Moreover, if you have lights from multiple manufacturers having to jump through multiple apps to adjust them is more annoying than walking up to them and turning a knob.
Now if you create content for Instagram you understand how crucial it is to capture the perfect behind-the-scenes footage. It adds depth and personality to your work, making it more relatable and easy to understand to your audience. This can now be done even with a phone or a pocket camera as they will pick up the same atmosphere and look as your main camera and this is a massive benefit as I want to help others learn to light scenes the way I do.
In conclusion, having this LED light changed my perception of shooting inside. It helped me think more as a cinematographer than a photographer and create sets that are more complex and atmospheric. While eliminating a lot of the trial and error part of my photography. I am now able to better monitor my frame in real-time, be it through the camera LCD or an external monitor and this helps me focus on other aspects of my photography. And the best part is I never have to say “I think one of my flashes didn’t fire, let’s try this again! “. If you want to further chat about this topic feel free to reach out over any of my social media channels and if you think you learned something from this post consider buying me a coffee using the button below.